Getting Started
Welcome to PhotoCaptioner AI — a native macOS app that uses Google Gemini to write captions for your photos in seconds. This section covers everything you need to do before captioning your first image.
System Requirements
- macOS 15.4 or later (Apple Silicon and Intel Macs supported)
- An active internet connection for AI captioning
- A Google account to obtain a Gemini API key (free tier available)
- Approximately 250 MB of free disk space
Installing from the App Store
- Open the Mac App Store from your Dock or Applications folder.
- Search for PhotoCaptioner AI.
- Click Get and then Install. You may be asked to sign in with your Apple ID.
- Once installed, PhotoCaptioner AI will appear in your Applications folder and Launchpad.
Launching the App for the First Time
The first time you open PhotoCaptioner AI, a short onboarding flow walks you through:
- Entering your Google Gemini API key (required for caption generation).
- Optionally entering your Google Places API key for location-aware captions.
- Granting access to your Photos library and a working folder where captioned images will be saved.
Both API keys are stored only in the macOS Keychain — never in plain text and never sent to any server other than Google's.
Choosing a Gemini Model
PhotoCaptioner AI supports two Google Gemini models — Gemini 3.6 Flash (the free default) and Gemini 3.1 Pro (more accurate, billing required). Section 2 below walks through how to obtain each key, what they cost, and how they compare in real-world captioning.
Granting Permissions
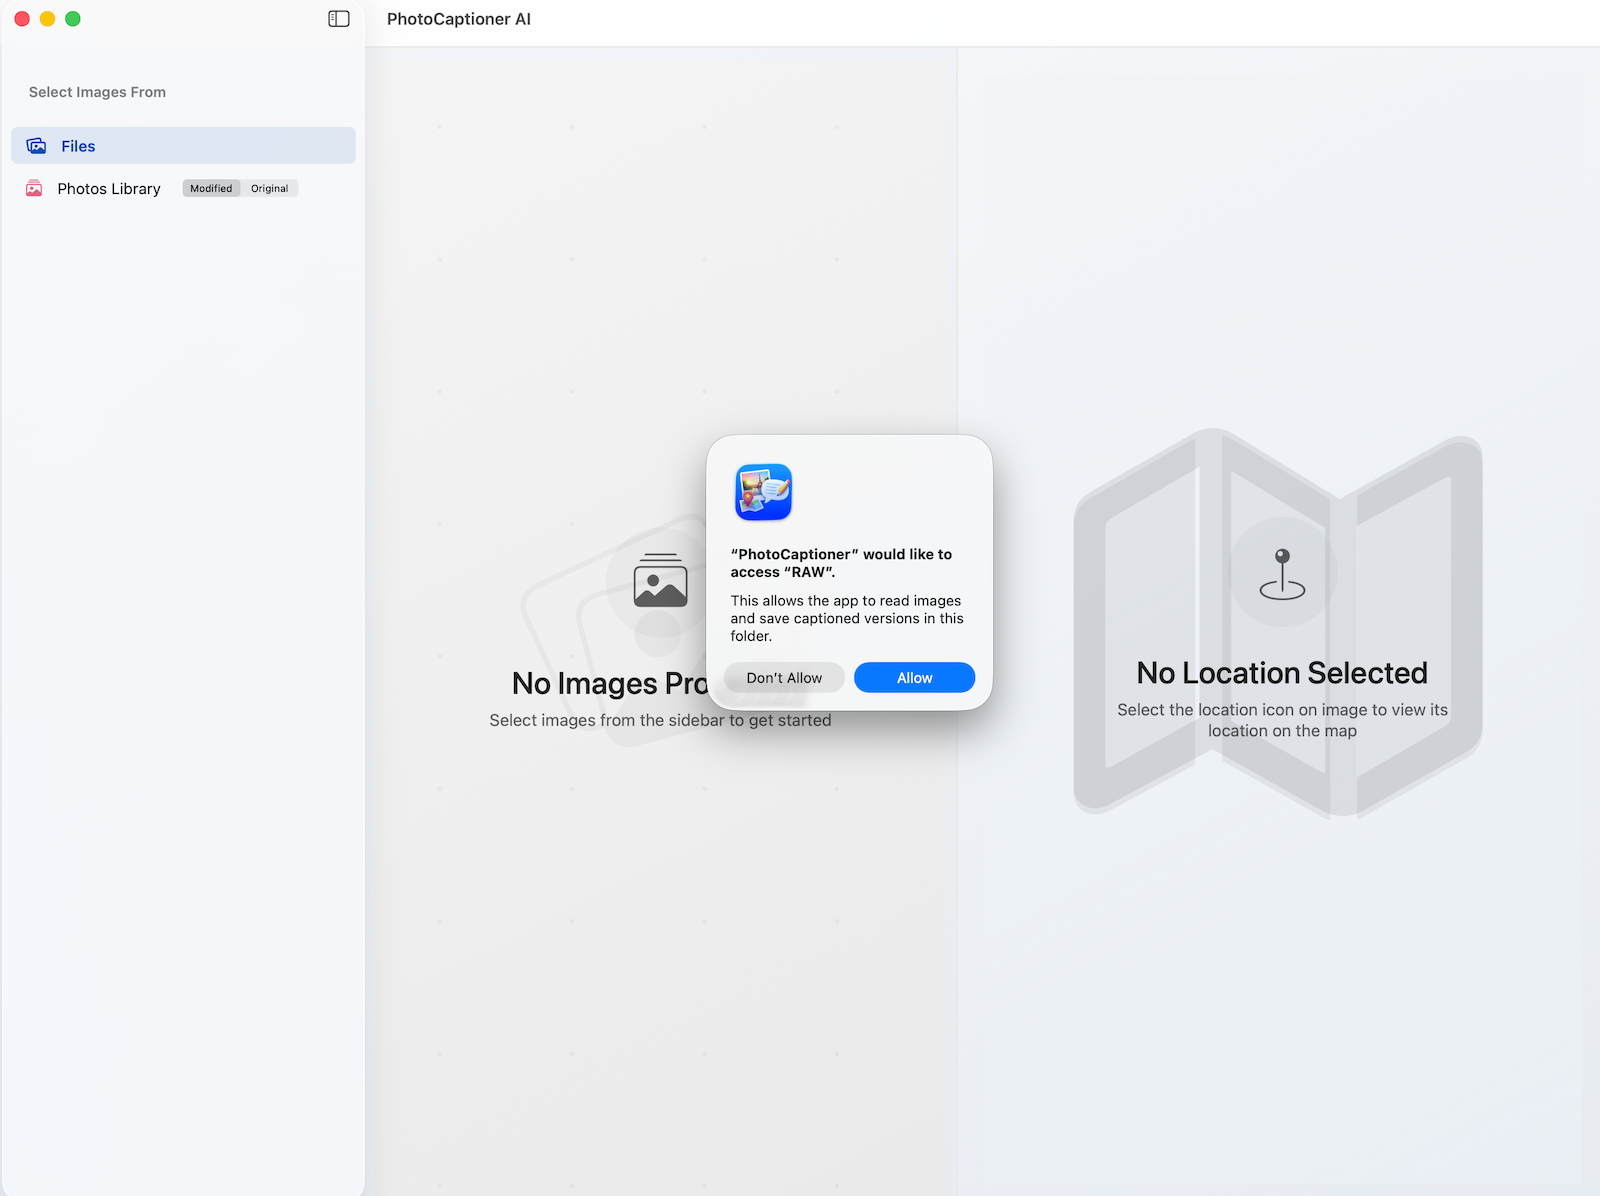
Because PhotoCaptioner AI is sandboxed for the Mac App Store, macOS will ask your permission before the app can read your photos or write to a folder:
- Photo Library access — required if you want to select images directly from the Photos app.
- Folder access — granted by selecting a folder via the standard macOS file picker. PhotoCaptioner AI remembers this choice using a security-scoped bookmark.
API Keys & Billing
PhotoCaptioner AI never operates its own captioning servers. Instead, you bring your own API keys from Google, which means you're billed by Google directly (or stay on Google's free tier). This section explains exactly which keys you need, how to install them, and what each will cost.
The Two Keys at a Glance
- Google Gemini API key — required. This is what writes the caption itself. Without it, no AI captions can be generated.
- Google Places API key — optional. This adds verified, GPS-grounded place names ("Yankee Stadium", "Café de Flore") to the captions of geotagged photos. PhotoCaptioner AI works fine without it.
Both keys are stored only in the macOS Keychain. They are never written to plain text files and never transmitted to Gottschalk Group servers — only to Google's API endpoints over HTTPS.
Choosing a Gemini Model
Before you create a key, decide which Gemini model you want to use. PhotoCaptioner AI supports two, and they live on different Google products:
- Gemini 3.6 Flash — model ID
gemini-3.6-flash. This is the default and runs on Google's free tier. No credit card required to start. Excellent for everyday captioning, landscapes, people, pets, food, and general scene description. Free-tier quota is shared across all apps using the key, and Google may rate-limit you during heavy usage. - Gemini 3.1 Pro — model ID
gemini-3.1-pro-preview. This is the paid model. It requires a Google Cloud project with billing enabled. It is noticeably better at identifying specific venues, landmarks, signage, and small visual details, and is more reliable when Google Search grounding is in play. Charged per request based on Google's published Gemini API pricing.
You can switch between models at any time in Settings → API Keys. The same key works for both models as long as the underlying Google account has billing enabled for the Pro variant.
Understanding the Free Tier
Gemini 3.6 Flash runs on Google's free tier, which is genuinely free but capped by the number of requests you can make per day. Google does not publish a fixed number and adjusts it over time, so the practical limit is best described as a few dozen captions per day. When you reach it, captioning stops and the app shows a "quota exceeded" message for the images it couldn't finish.
PhotoCaptioner doesn't cap how many photos you add at once — select as many as you like. On the Gemini Flash 3.6 free tier, if you pick more than five at once, the app gives you a quick heads-up that some may not finish today; you can caption them anyway or cancel. (This heads-up doesn't appear once you switch to Gemini 3.1 Pro or enable billing on your Flash key, since neither is subject to the free-tier daily limit.) Your batch is paced automatically to stay within Google's limits, and the only ceiling is the daily quota described above. If you reach Google's daily limit partway through a batch, the photos that didn't finish are simply left without a caption (the app shows a brief one-time note explaining what happened), and you can re-run them after the daily reset without re-selecting your files.
That per-day ceiling is Google's, not the app's. Enable billing on your Google key to lift it and speed captioning up. Separately, PhotoCaptioner's free tier includes your first 25 captions (cache hits count); after that, a one-time Pro upgrade unlocks unlimited use of the app.
- One photo ≈ one request. With grounding off (the free-tier default), each photo you caption uses a single Gemini request — that's already the minimum possible, so the daily ceiling is set by Google, not by the app.
- Cache hits are free against Google. Re-saving or re-opening photos you've already captioned is served from PhotoCaptioner's local cache and does not consume any Gemini quota (see the caching note in Section 5).
- Keep grounding OFF on a plain free-tier key. A grounded request is billed against a much smaller free-tier pool and will exhaust your day almost immediately. Leave the grounding toggle off unless you have enabled billing (see the grounding explanation in Section 3).
- When you hit the limit, simply wait for the daily reset (around midnight Pacific Time) and re-run the images that didn't finish — PhotoCaptioner keeps them in the grid so you don't have to re-select your files — or enable billing on the same Google account for a much higher ceiling.
Why Enable Billing (and What It Costs)
Enabling billing on the Google Cloud project that owns your Gemini key removes the free-tier bottleneck. It is the right move once you're regularly captioning more than a handful of photos at a time. You don't need to switch to Gemini 3.1 Pro just to escape the daily limit — enabling billing on your Flash key removes it and still costs less than Pro.
- Dramatically higher throughput — the "few dozen per day" ceiling effectively disappears, so you can caption large batches in one sitting.
- Better captions with grounding — Google Search grounding now draws from its own pool instead of the tiny free-tier request quota, so Gemini can look up venue, landmark, and event names for more precise results.
- Access to Gemini 3.1 Pro — the most accurate model for specific venues, signage, and fine visual detail.
Step 1 — Create Your Google Gemini API Key (Required)
Prefer to watch? This short walkthrough covers creating a free Gemini API key in Google AI Studio from start to finish:
Or follow the written steps. For most users on the free tier:
- Open aistudio.google.com/app/apikey in your browser.
- Sign in with the Google account you want to use for captioning or create one if you don't have one.
- Click Create API key. If prompted, accept the Gemini API Terms of Service.
- If you only plan to use Flash 3.6, you can create the key in a new project — no billing setup is needed.
- Copy the key (it begins with
AIza…) to the clipboard. - In PhotoCaptioner AI, open Settings → API Keys and paste the key into the Google Gemini API Key field. Click on “Save” and then “Verify” to ensure that it is functioning correctly. The key is saved directly to the macOS Keychain.
Step 2 — Enable Billing for Gemini 3.1 Pro (Optional)
Only required if you want to use the Gemini Pro model. The same key from Step 1 will start working with Pro automatically once billing is enabled on its project:
- Open console.cloud.google.com/billing.
- Create a billing account if you don't already have one. Google will ask for a credit card.
- Link the billing account to the same Google Cloud project that owns your Gemini API key.
- In APIs & Services → Library, search for Generative Language API and click Enable.
- Back in PhotoCaptioner AI, open Settings → API Keys and switch the model to Gemini 3.1 Pro (requires billing). If you are staying on Flash 3.6 but want Google Search grounding, turn on the Billing enabled on my Google Cloud project toggle (see Section 3).
You can monitor real-time usage and set hard spend caps under Billing → Budgets & alerts in the Cloud Console. We strongly recommend setting a budget cap before running large batches.
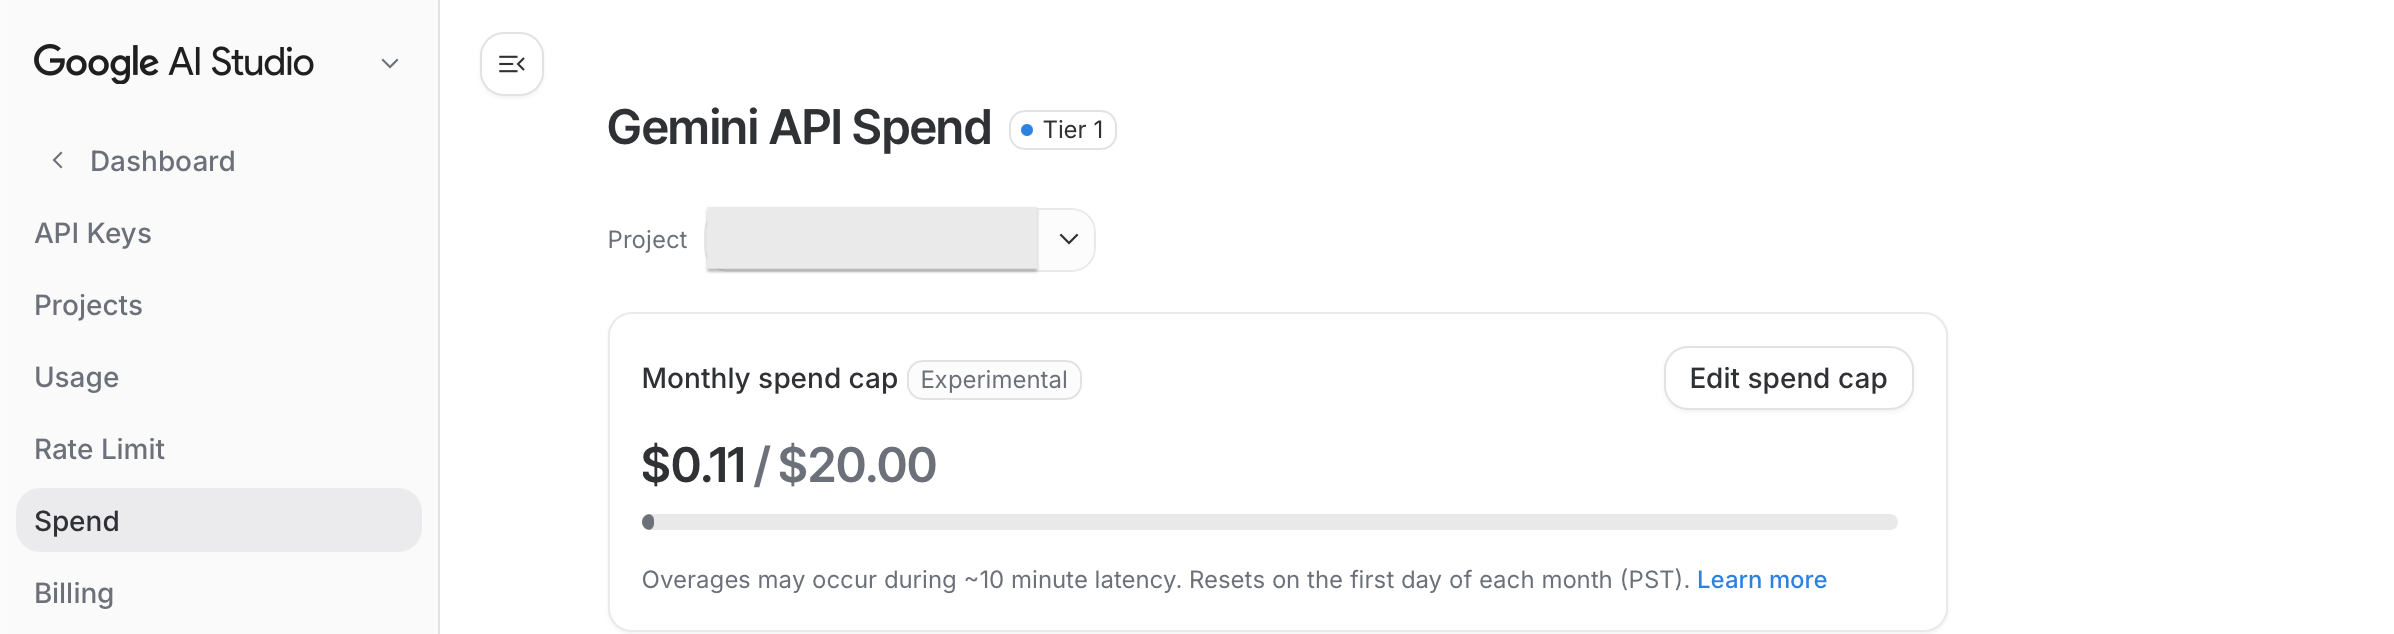
Set a Monthly Spend Cap (Strongly Recommended)
Once billing is enabled, the simplest way to protect yourself from a surprise bill is to set a monthly spend cap directly in Google AI Studio. This is a hard ceiling on what your Gemini API key can spend in a calendar month — independent of the Cloud Console budget alerts, which only notify you rather than stop usage.
- Open Google AI Studio and sign in with the account that owns your Gemini key.
- In the left sidebar, click Dashboard, then choose Spend.
- At the top, confirm the Project dropdown is set to the same project your Gemini API key belongs to (for example, "Photo Captioner Project").
- In the Monthly spend cap card, click Edit spend cap.
- Enter a comfortable monthly limit — for example $20.00 — and save. The card then shows your current spend against the cap, e.g.
$0.11 / $20.00, with a progress bar.
If you only use Gemini 3.6 Flash on the free tier with grounding off, you never incur charges and don't need a spend cap. The cap matters once you enable billing — whether that's for Gemini 3.1 Pro, for Flash grounding, or for the Google Places API.
Step 3 — Add a Google Places API Key (Optional)
The Places key is what turns "a stadium in New York" into "Yankee Stadium". It works by taking the GPS coordinates from your photo's EXIF data and asking Google Places for the closest verified businesses, landmarks, and points of interest. Gemini then uses that ground truth to write a precise caption.
The advantage:
- Far more accurate venue and landmark names — verified by Google, not guessed by the model.
- Reduces hallucinated place names on photos taken in less-famous spots (small cafés, regional museums, neighborhood parks).
- Makes captions on geotagged photos much more useful for cataloging, search, and Lightroom keywording.
The cost:
- Places API is not on the same free tier as Gemini. It is part of Google Maps Platform, which has its own pricing.
- Google Maps Platform currently provides a recurring monthly free credit that covers many casual users. Above that, each Nearby Search and each Text Search request is billed per call.
- PhotoCaptioner AI calls Places once per geotagged photo (Nearby Search) and, when Gemini names a specific landmark, may make one additional Text Search to verify coordinates. Photos without GPS data do not consume any Places quota.
- If you process large batches of geotagged photos, the Places bill can exceed the Gemini bill. Check current rates at mapsplatform.google.com/pricing.
How to install the Places key:
- Open console.cloud.google.com/google/maps-apis/credentials and sign in.
- Pick or create a Google Cloud project — it can be the same one you used for Gemini.
- Make sure billing is linked to that project (same as Step 2 above).
- Under APIs & Services → Library, enable both Places API (New) and Geocoding API.
- Back on the Credentials page, click Create credentials → API key. Copy the new key.
- (Recommended) Click the new key and add an API restriction limiting it to Places API (New) and Geocoding API. This protects the key if it's ever exposed.
- In PhotoCaptioner AI, open Settings → API Keys and paste the key into the Google Places API Key field.
- Toggle Use Google Places ON in Settings → API Keys.
You can turn Places off at any time without deleting the key — useful if you want to pause Places billing for a session without re-entering credentials later. When Places is off, captions are still generated using GPS hints, but venue names come from Gemini's visual reasoning instead of verified Google data.
Settings Window
Open Settings from the menu bar (PhotoCaptioner AI → Settings…) or with ⌘,. The window is organized as a sidebar with four tabs: General, API Keys, Location, and Processing. Every option is explained below.
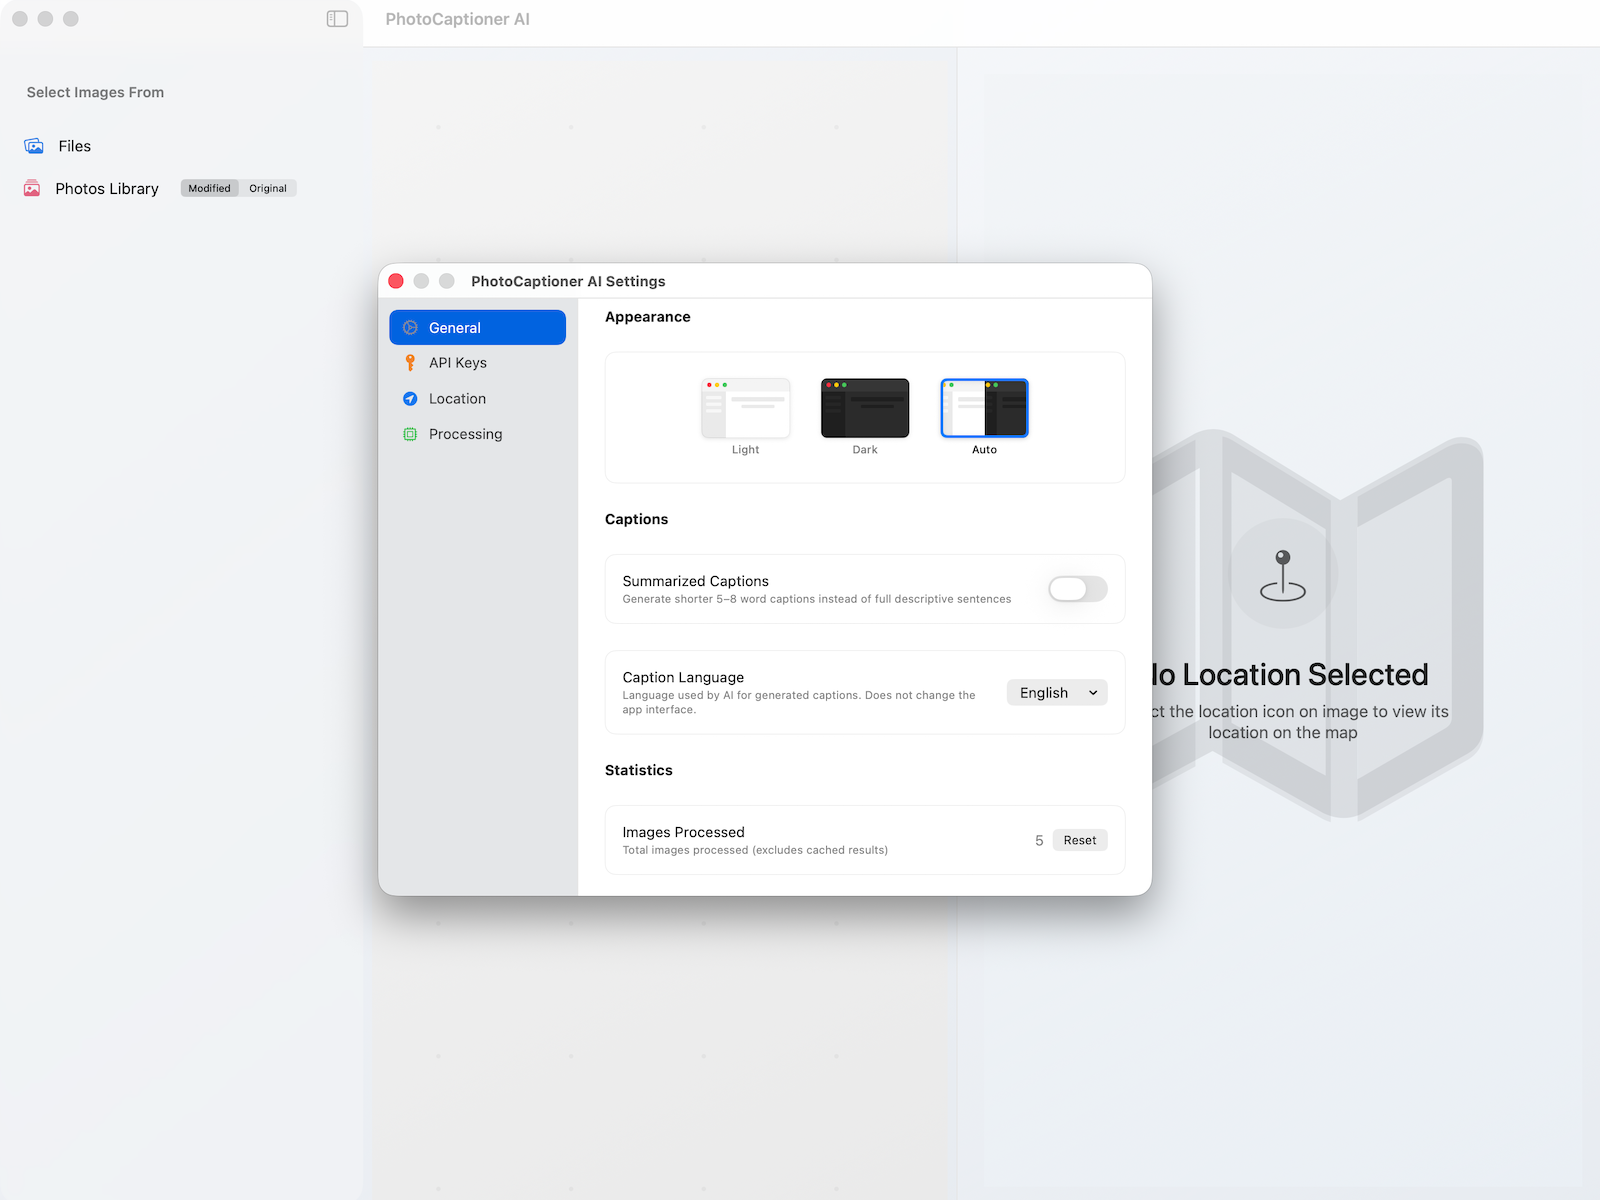
General Tab
Visual preferences, caption style, statistics, purchases, and legal links.
Appearance
- Light / Dark / Auto — three thumbnail previews. Auto follows the macOS system appearance. The change is applied instantly across all PhotoCaptioner AI windows.
Captions
- Summarized Captions — toggle. When ON, Gemini returns short 5–8 word captions ("Sunset over the Brooklyn Bridge"). When OFF (default), it returns full descriptive sentences. Useful when you're cataloging large batches and want concise EXIF descriptions.
- Caption Language — dropdown menu. Sets the language Gemini uses for the generated text. Options: English, Spanish, French, German, Italian, Portuguese, Dutch, Chinese (Simplified), Japanese, Korean. This does not change the app's interface language.
- Include People's Names — opt-in. When enabled, PhotoCaptioner AI uses the names you've tagged in Apple Photos' People feature so captions can name your family and friends instead of saying "a man" or "a couple". Click Enable… and select your Photos library (a file picker opens to your Pictures folder, where it's normally named Photos Library.photoslibrary). This grants one-time, read-only access so the app can look up the names locally — nothing is uploaded. Once granted it shows On; use Turn Off to revoke access at any time.
Statistics
- Images Processed — counter showing total AI-captioned images for the current install. Excludes cache hits. The Reset button zeroes this counter only — it does not affect your Pro entitlement or the free-tier gate.
Purchases
- PhotoCaptioner Pro — shows the unlock status. The free tier processes 25 images (cache hits count). After that, the paywall appears. The one-time Pro in-app purchase unlocks unlimited captions on your Apple ID.
- Restore Purchase — button. Click after reinstalling or switching Macs. Uses your existing Apple ID — no extra charge.
About AI Captions
- Reminder that Gemini AI output may contain inaccuracies and that photos go directly from your Mac to Google under your API key.
- Report an objectionable caption — opens a pre-filled email to support so you can flag inappropriate AI output.
Legal
- Links to the Privacy Policy and Terms of Service, plus the installed app version number.
API Keys Tab
Where you install and verify your Google credentials. If the required Gemini key is missing, Settings opens to this tab automatically on launch.
Welcome banner (first run only)
While the Gemini key is empty, a yellow welcome card appears with a one-click link to your Google account and a step-by-step button that opens Google AI Studio in your browser.
Google Gemini API Key
- API key field — paste the Gemini key (begins with
AIza…). The field uses a custom no-auto-focus implementation to avoid macOS's annoying focus-flash; click into it to type. - Show/Hide key — eye icon toggles between masked and plain text so you can confirm what you pasted.
- Save — button. Writes the key to the macOS Keychain.
- Verify — button. Sends a single test request to Gemini to confirm the key is real, active, and tied to a working project. A green checkmark means saved and verified; red means Google rejected it.
- Model — picker. Choose between:
- Gemini 3.6 Flash (daily free tier) — default. No billing required; the free tier has a small daily limit.
- Gemini 3.1 Pro (requires billing) — switching to Pro pops up a confirmation dialog reminding you that without billing on Google Cloud, every Pro request will fail. Click Switch to Pro only after enabling billing.
- Billing enabled on my Google Cloud project — toggle, shown only when Gemini 3.6 Flash is selected. Turning it ON does three things: it lets Gemini check the live web (Google Search grounding) for more accurate venue, landmark, and event names; it removes the daily limit; and it speeds up captioning. A Learn more… link next to it opens this guide.
- Leave it OFF for a plain free-tier key. On a free key with no billing, every grounded request is counted against the tiny free-tier daily request quota (roughly 20 calls/day) instead of the separate grounding pool, so it will exhaust the quota almost instantly and captions will start failing with "quota exceeded" errors on the very first photos.
- Turn it ON only after you have actually enabled billing on the Google Cloud project that owns your Gemini key (see Section 2, Step 2). With billing active, grounding draws from its own monthly pool and the toggle pays off in more accurate captions.
- Gemini 3.1 Pro always uses grounding, so this toggle does not appear when Pro is selected. Adding a Google Places API key also turns grounding on automatically.
Advanced — Google Places (optional, requires billing)
Collapsed by default. The whole section is only enabled when the model picker is set to Gemini 3.1 Pro — Flash 3.6 does not use Places. When the section is enabled, you'll see:
- Use Google Places — runtime opt-out toggle. When ON, the pipeline calls Places for every geotagged photo. When OFF, your Places key stays in Keychain but no Places requests are made — useful to pause billing without losing the credential. Disabled until a Places key is configured.
- Google Places API key field — same paste / show / Save / Verify controls as the Gemini key. Verify confirms the key is tied to a billing-enabled project with Places API (New) enabled.
- How to get or replace these API keys — disclosure with step-by-step links to AI Studio (Gemini) and the Cloud Console Credentials page (Places).
- Reminder text: "Google bills your account directly for API usage. PhotoCaptioner never receives or stores billing information."
Location Tab
How GPS and place-name lookups are applied to captions.
Location
- Detailed Location — toggle. When ON, Gemini includes street names and addresses (when known) in the location description. When OFF, captions only mention the neighborhood, city, or named landmark. Useful if you'd rather not embed precise street addresses in shared photos.
Nearby Places Search
This subsection only appears when all three conditions are met: Gemini 3.1 Pro is selected, a Places API key is saved, and Use Google Places is ON.
- Search Radius — slider from 5 m to 1610 m (about 1 mile), in 5 m steps. Controls how far around the photo's GPS coordinates PhotoCaptioner AI looks for verified Places matches. Smaller is more precise (good for cities), larger catches more candidates (good for hikes and parks).
- Place Types — chip selector. Pick which categories Places should search for. Available types: Tourist attraction, Lodging, Restaurant, Café, Bar, Store, Park, Museum, Church, Airport, Gas station, Bank, Winery. The counter shows how many you have selected; restricting types makes results more relevant and reduces the chance of an irrelevant nearby business being picked.
Processing Tab
RAW output, cache, and pipeline behavior.
RAW Files
This setting controls what PhotoCaptioner AI writes when you save a caption for a proprietary RAW file — formats like CR2, CR3, NEF, ARW, ORF, RW2, RAF. Because these formats can't be safely rewritten in place, the caption is written to a companion file instead. A segmented picker offers three modes:
- XMP sidecar — writes an Adobe-standard
.xmpfile with the same base name next to the RAW (e.g.DSC_0042.xmpbesideDSC_0042.NEF). This is exactly where Lightroom, Capture One, and Bridge look for RAW captions, so they pick it up automatically. If a sidecar already exists, PhotoCaptioner AI merges into it — only the caption and optional GPS fields are touched, leaving your existing ratings, keywords, color labels, and develop settings untouched. - TIFF copy — writes a captioned
.tiffsibling with the same base name next to the RAW, with the caption embedded in standard TIFF metadata. Useful for tools that read embedded image metadata but don't understand XMP sidecars. - Both (default) — writes the XMP sidecar and the TIFF copy, so the caption is readable no matter which format the next tool in your workflow prefers.
Caching
- Enable Image Caching — toggle. When ON (default), every successfully captioned photo is stored in a local SQLite cache keyed by image content. Opening the same photo again returns the cached result instantly with no API call and no cost. Turn it OFF if you want every run to be a fresh API call.
- Cached Images — info row showing how many entries are stored and how much disk space they use.
- Clear Cache — button. Prompts for confirmation, then deletes every cached caption from disk. Originals on disk are untouched. The next time you open those photos, they'll be sent to Gemini again (and re-billed).
The cache lives in the app's sandbox container — it is automatically removed if you uninstall PhotoCaptioner AI, and is not synced via iCloud.
Toolbar Buttons
Almost every action in PhotoCaptioner AI starts from one of the toolbar buttons. The left sidebar holds the source / processing / cleanup controls, and the top of the main pane holds the save and selection controls. Each button is color-coded so you can find it at a glance.
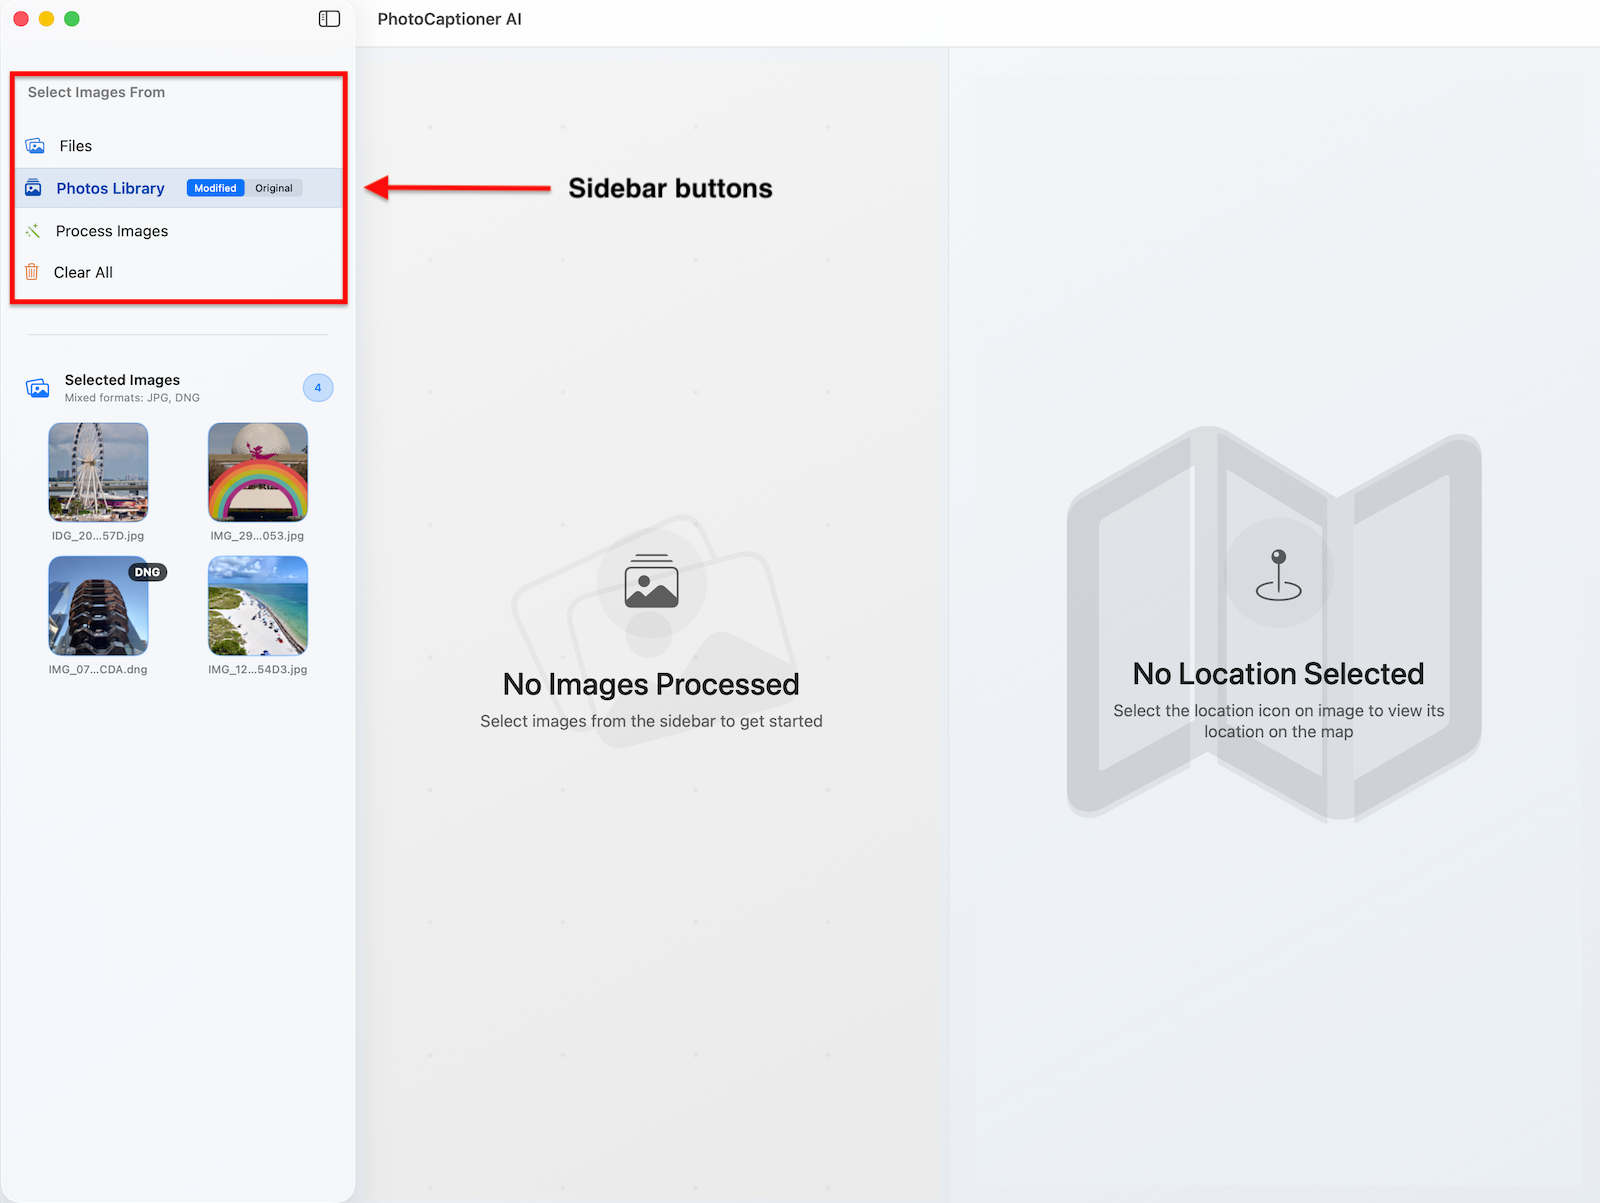
Sidebar — Select Images From
This panel sits at the top of the left sidebar under the heading "Select Images From". The first two buttons are always visible; the last two appear only after at least one image has been loaded.
Files (blue)
- Opens the standard macOS file picker so you can choose individual images or entire folders.
- If you pick a folder, every supported image inside it (JPEG, HEIC, PNG, TIFF, DNG, RAW) is added to the workspace.
- You can select multiple files or folders in one pass with
⌘-clickandShift-click. - The folder is remembered between sessions and a security-scoped bookmark is stored so saving back in place will work without re-prompting.
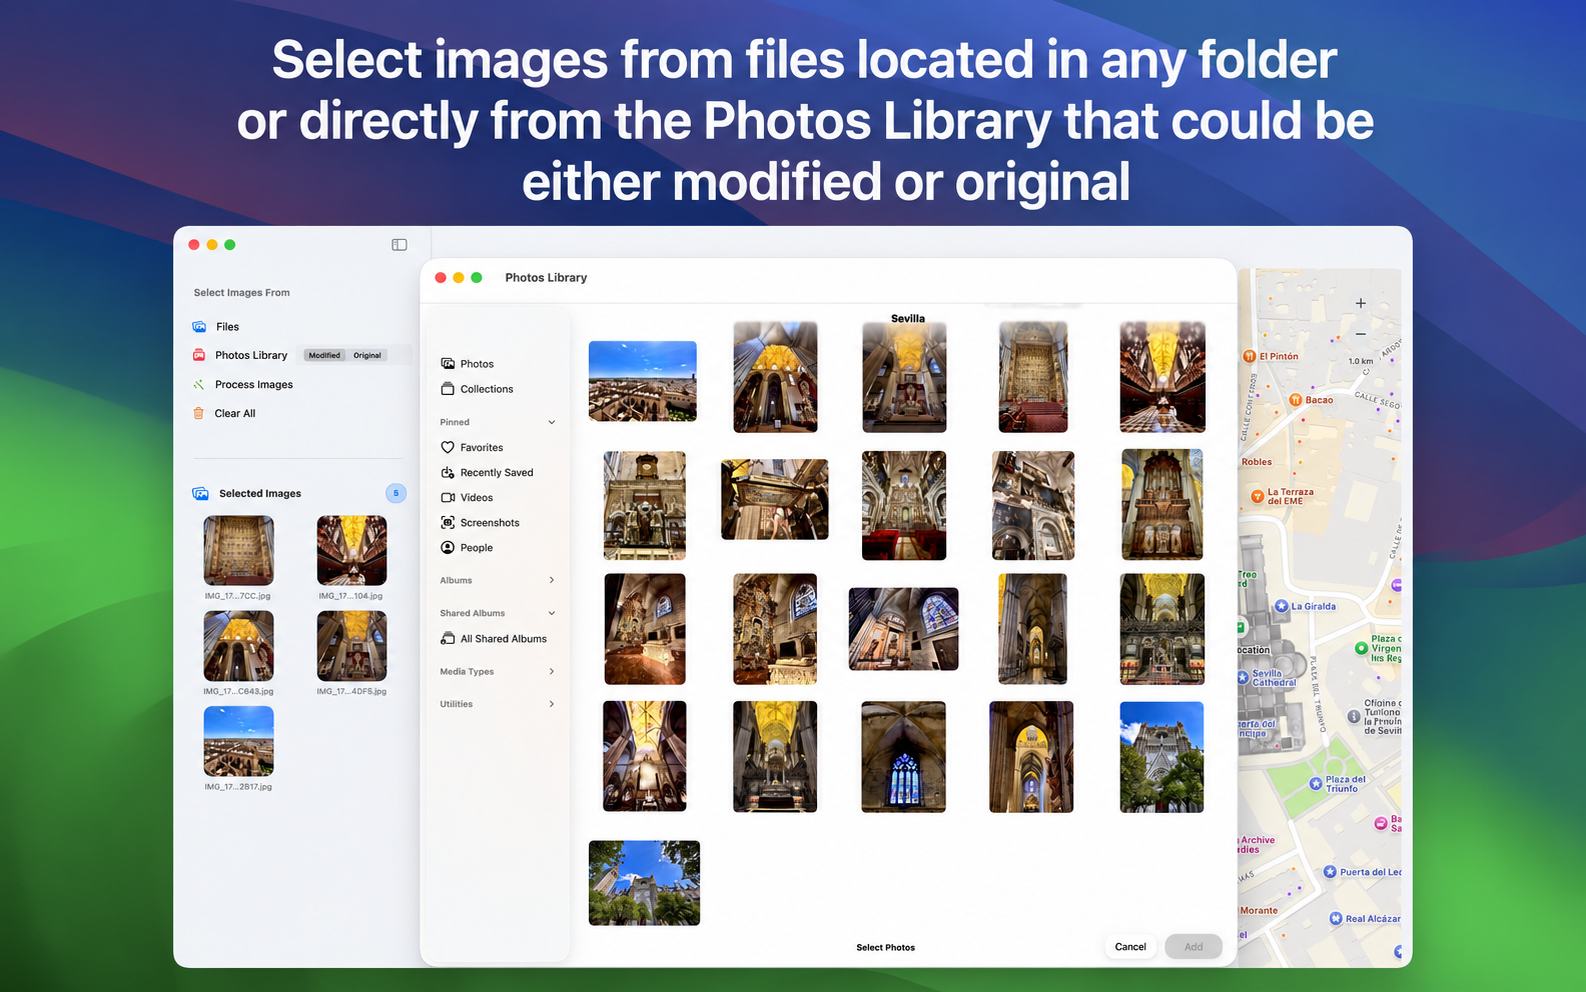
Photos Library (coral/pink)
- Opens an embedded Photos picker that lets you browse your Apple Photos library — albums, dates, recent imports, and search.
- Has an inline Modified/Original picker next to its label. Modified uses the edited version (DNGs convert to JPEG); Original uses the untouched version (DNGs stay as DNG). See Section 5 for the full breakdown.
- Shows a live "Exporting NN%" indicator while photos are being copied out of the Photos container into a temporary working folder.
- Selections are appended to whatever you already have in the workspace — you can mix Photos Library items with folder-loaded items in the same batch.
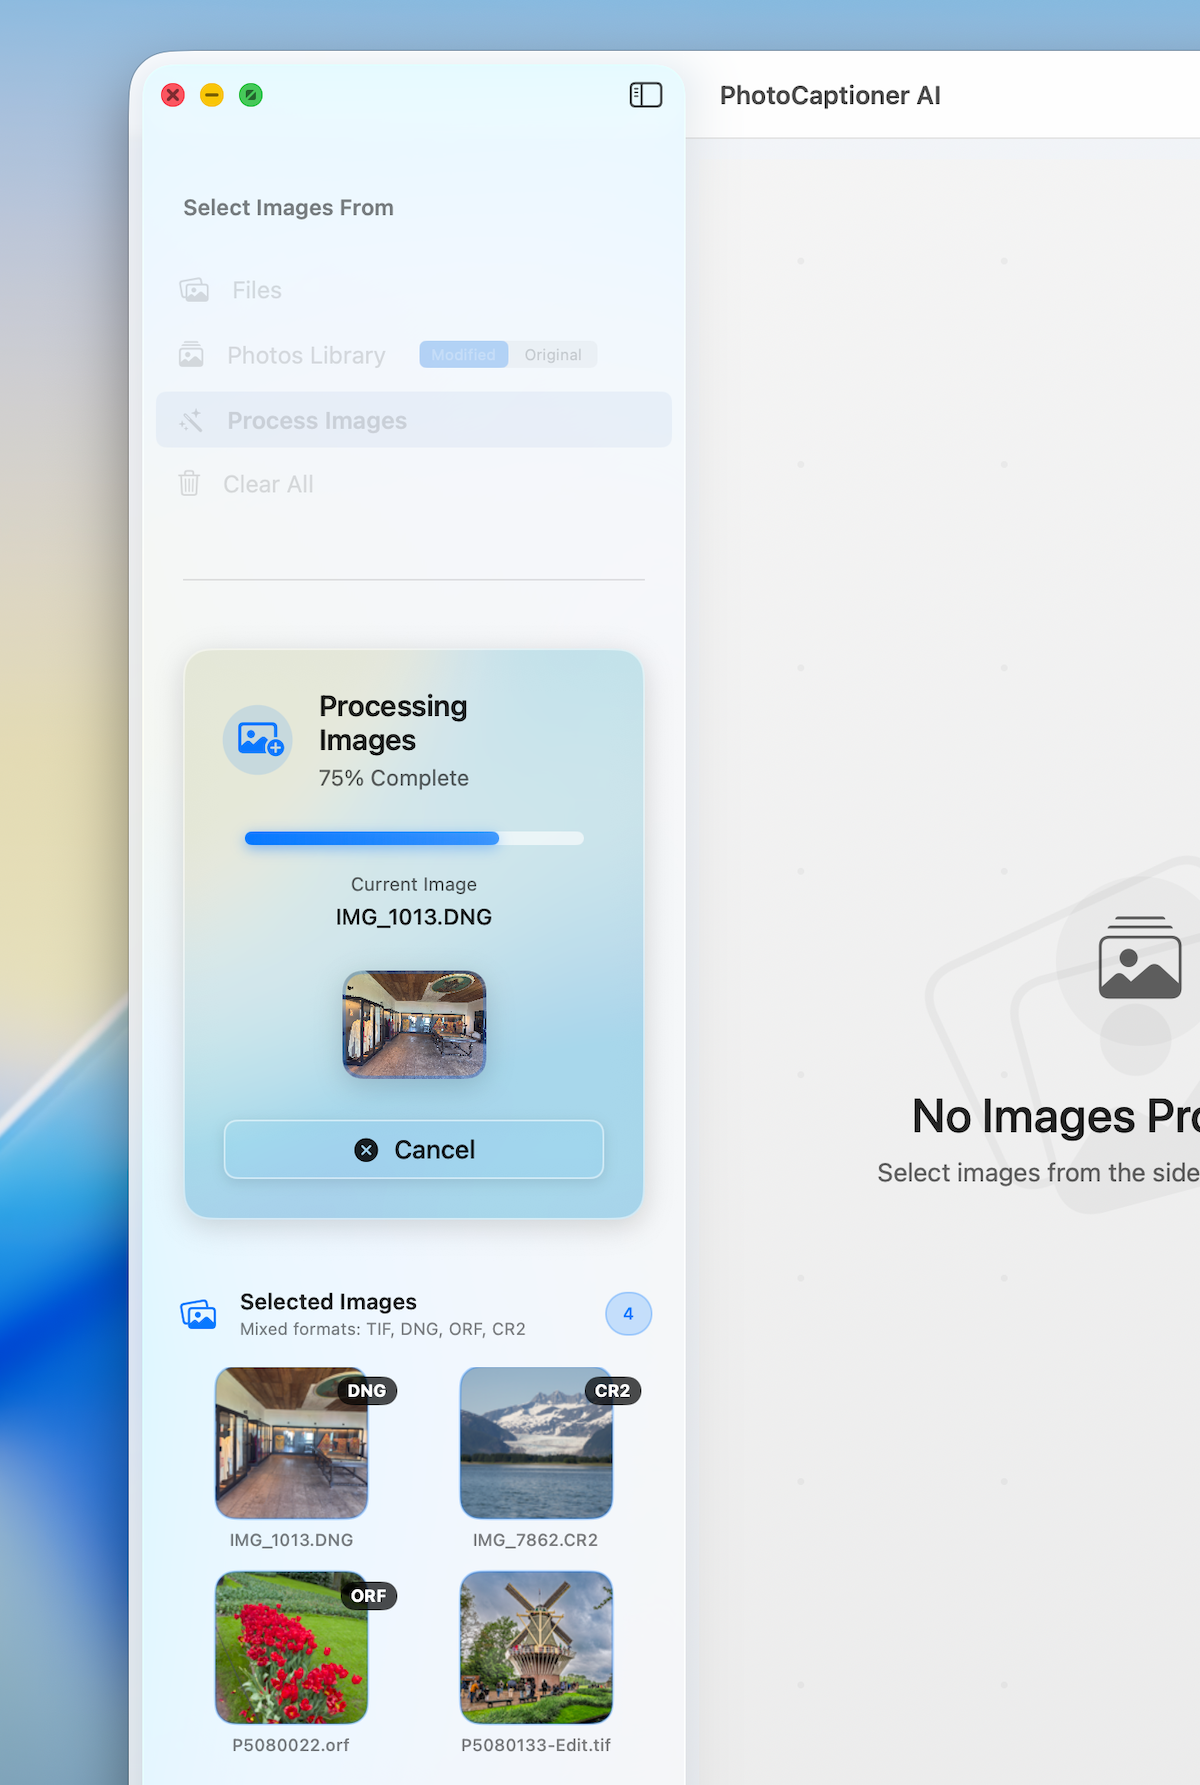
Process Images (green) — appears after images are loaded
- Kicks off the AI captioning pipeline for every image currently in the workspace.
- Up to three photos are sent to Gemini in parallel; a progress bar in the sidebar shows current image, percentage, and a thumbnail preview.
- Disabled while images are still loading from a folder or Photos Library export.
- You can keep working in the app while processing runs — the cancel button on the progress card stops the batch cleanly.
Clear All (orange) — appears after images are loaded
- Removes every loaded image and every generated caption from the workspace. The originals on disk are untouched.
- Useful before starting a fresh batch from a different folder, or to free memory after a large export.
- The cache is not cleared by this button — cached captions for the same photos will still load instantly next time. To wipe the cache, use Settings → Processing → Clear Cache.
Main Pane — Processed Images Header
Once images have been captioned, the right-hand pane shows a Processed Images header with two control groups:
Save Selected (prominent blue button)
- Saves every currently-selected captioned image in a single batch. Shows a progress bar with the current filename and percentage.
- Disabled when nothing is selected, or when the selection's captions are all empty/error sentinels — the tooltip explains why.
- If the selection mixes folder-sourced and Photos Library-sourced images, you'll be prompted with how each group will be written (folder images go back to their original folders; Photos Library images go to a folder you pick).
Select: All / None / GPS Only (segmented picker)
- All — selects every processed image in the workspace.
- None — clears the selection without removing the photos.
- GPS Only — selects only the photos that have GPS data (EXIF or landmark-derived). The counter next to the label tells you how many qualify.
- The picker is purely a selection helper — it does not save or process anything by itself. Use it to set up the selection, then click Save Selected or run another action.
Per-Card Controls
Each individual caption card in the processed-images grid carries its own row of small icon buttons:
- Save — writes only that photo's caption to disk (see Section 8).
- Reprocess — runs a fresh Gemini call for just that photo with optional overrides (see Section 7).
- Revert — restores the photo's original pre-PhotoCaptioner caption from the catalog (see Section 7). Disabled when there is no stored original to revert to.
- Location pin — green if GPS came from EXIF, orange if derived from the caption (see Section 9). Click it to recenter the map on this photo.
Menu Bar Shortcuts
⌘,— open Settings.⌘O— equivalent of clicking the Files button.⌘A— select all processed images.⌘S— Save Selected.⌘G— Process / Generate Captions.⌘Z— undo the most recent caption edit in the inline editor.
Selecting Photos
PhotoCaptioner AI gives you two ways to load images: directly from a folder on your Mac, or from your Apple Photos library.
Opening a Folder from Your Mac
- Click the Open Folder button in the toolbar (or use
⌘O). - Choose any folder that contains JPEG, HEIC, PNG, TIFF, or DNG/RAW files.
- PhotoCaptioner AI generates fast thumbnails and displays the folder as a photo grid.
The folder is remembered between sessions, so you can pick up where you left off.
Selecting from Your Photo Library
- Click Photos Library in the toolbar.
- The first time, macOS will ask permission to read your library — choose Allow.
- Your albums, dates, and recent imports load directly. No images are copied or duplicated.
Tagged People Are Carried Into Captions
If you've used Apple Photos' face-recognition feature to tag people in your library, PhotoCaptioner AI can pass those names to Gemini, so the generated caption refers to your family and friends by name instead of "a man" or "two women" — for example "Anna and Marco laughing at a sidewalk café in Florence."
- Only named, confirmed people are used — unnamed or unconfirmed faces are ignored. Multiple people per photo are supported; Gemini receives the full list.
- The names are written into the saved file's metadata (XMP-iptcExt
PersonInImage) so other tools like Lightroom and Bridge can read them later. - To exclude someone from captions, remove their face tag in the Photos app, or simply leave Include People's Names turned off.
- You can revoke access at any time with the Turn Off button in Settings.
When you open a folder directly (instead of the Photos Library), PhotoCaptioner AI reads any names already embedded in the file's own metadata — IPTC/XMP PersonInImage or face-region names written by tools like Lightroom, Bridge, or a Photos "Export with metadata". No library access is needed for those.
Modified vs Original
Next to the Photos Library button you'll find a small segmented control with two options. This determines which version of each photo PhotoCaptioner AI asks the Photos app for, and it has a real impact on caption quality and file format.
- Modified (default) — uses the current version of each photo, which is the edited result you see in the Photos app. Any crops, color tweaks, filters, or extensions you applied are baked in. RAW formats like DNG are converted to JPEG on export, which makes captioning faster but loses RAW data. Pick this when you want PhotoCaptioner AI to caption the photo exactly as it looks in your library.
- Original — uses the untouched version straight from the camera roll, before any Photos edits. RAW files stay in their native format (DNG remains DNG, not JPEG), so you keep full sensor data. Pick this when you're cataloging RAW archives or want captions based on the unedited frame.
Navigating the Photo Grid
- Use the arrow keys to move between photos.
- Scroll or swipe to scan through large folders quickly.
- The thumbnail size can be adjusted from the toolbar slider.
- Click any thumbnail to view it full-size in the detail panel.
Selecting Individual or Multiple Photos
- Click to select a single photo.
- ⌘-click to add or remove individual photos from a selection.
- Shift-click to select a contiguous range.
- ⌘A selects every photo in the current folder or album.
The status bar shows how many photos are selected and ready for captioning.
Generating Captions
This is the heart of PhotoCaptioner AI. Each photo is sent to Google's Gemini model, which returns a primary caption plus three alternates you can choose between or edit by hand.
Generating Captions for Selected Photos
- Select one or more photos in the grid.
- Click Generate Captions in the toolbar (or press
⌘G). - A progress bar shows how many photos are queued, in flight, and complete.
- Captions appear inline beneath each thumbnail as they are returned.
PhotoCaptioner AI processes up to three photos in parallel to balance speed with API reliability. Large batches simply take longer — you can keep working while they run.
Selecting and Choosing Between Alternates
Every photo gets one primary caption and three shorter or differently-styled alternates. To see them:
- Click a captioned photo to open the detail panel.
- The primary caption appears at the top. The three alternates appear below it.
- Click any alternate to promote it to the primary caption.
Editing or Tweaking a Caption
- Click directly inside the caption field to edit the text by hand.
- Changes are saved as you type and survive app restarts via the local cache.
- Press
⌘Zto undo, or use the Regenerate button to ask Gemini for a fresh take.
What Happens When a Caption Is Generated
For each photo you caption, PhotoCaptioner AI does the following:
- Reads the image data and EXIF GPS coordinates (if any) locally on your Mac.
- Optionally looks up nearby places via the Google Places API to ground the caption (requires the optional Places API key).
- Sends the image, GPS hint, and any embedded person names to the Google Gemini API using your own API key.
- Receives a structured response with one primary caption and three alternates.
- Stores the result in a local SQLite cache so the same photo never needs to be re-sent.
Your photos are never uploaded to Gottschalk Group servers — we don't operate any. Google's data handling is governed by their own privacy terms.
Reprocess & Revert
Two of the most useful per-photo controls live on the caption card itself. They give you a precise way to fix a single bad caption without re-running an entire batch.
Reprocess — Re-Run a Single Photo
The Reprocess button asks Gemini to generate a brand new caption for one specific photo, ignoring any cached result. Use it when:
- The caption mentions the wrong landmark or venue and you want a clean second opinion.
- You've switched between Flash 3.6 and Pro 3.1 and want to see what the other model would say.
- You've added or changed your Google Places API key and want a verified place name applied.
- You want to try a different search radius, place type filter, or summarized caption mode for just this one image.
How to reprocess:
- Click the Reprocess icon on the caption card you want to redo.
- A sheet opens with the per-photo overrides — detailed location on/off, Places radius, place type filters, summarized style.
- Adjust whatever you want, then confirm. PhotoCaptioner AI runs a fresh Gemini call with the cache disabled just for this photo.
- The new caption replaces the current one in the card. Your saved state resets, so click Save to write it to the file.
Reprocess uses a new API call, so it counts against your Gemini (and, if enabled, Places) quota. Other photos in the batch are untouched and their cached captions are preserved.
Revert to Original — Restore the Pre-PhotoCaptioner Caption
Every time PhotoCaptioner AI opens an image, it reads the existing EXIF ImageDescription and IPTC Caption/Abstract fields and stores them in an internal catalog. The Revert button uses that catalog to restore whatever caption (or empty field) was in the file before the AI touched it.
Use Revert when:
- The AI caption is worse than the one you already had — maybe a hand-typed Lightroom caption you don't want to overwrite.
- You generated a caption by accident and want to put the file back exactly the way it was.
- You're testing different settings and want a baseline before regenerating.
How to revert:
- Click the Revert icon on the caption card.
- The caption field is immediately replaced with the original text from when PhotoCaptioner AI first opened the photo. A confirmation banner appears.
- The reverted caption is staged in-memory — your file on disk hasn't changed yet.
- Click Save to actually write the original caption back into the file.
Even after a successful save of an AI caption, you can still re-open the same photo later and use Revert — the original is kept in the catalog across sessions.
Saving Results
Captions are not saved automatically — you decide when to commit them to disk. PhotoCaptioner AI saves into the standard EXIF ImageDescription and IPTC Caption/Abstract metadata fields, so the caption travels with the file and is read by Photos, Lightroom, Preview, Finder's Get Info panel, Spotlight, and any other tool that respects image metadata.
Two Ways to Save
Every caption card has a Save button, and the toolbar has a Save All Selected button. They do the same job at different scales.
- Save (individual) — the icon on a single caption card. Writes only that photo's caption to disk. Best for one-off edits, the Reprocess/Revert workflow, or anytime you want to commit photos one at a time.
- Save All Selected (batch) — the Save button in the main toolbar (or
⌘S). Writes every selected photo in one pass with a progress bar. Use it after generating captions for a folder or library batch.
In both cases, the original photo is never replaced or deleted — PhotoCaptioner AI only modifies metadata in-place (for folder-sourced images) or writes a new file alongside it (for RAW and Photos Library images).
Saving Photos That Were Loaded From a Folder
When the source is a folder you opened with Open Folder, PhotoCaptioner AI saves back into the same file at the same location — no folder picker, no copies.
- JPEG, HEIC, PNG, TIFF — the caption (and optional GPS) is written directly into the existing file's metadata. The filename and folder stay exactly the same; only the metadata bytes change.
- DNG (Adobe RAW) — the XMP packet inside the DNG is updated in place. The DNG remains a DNG; no new file is created.
- Proprietary RAW (CR2, NEF, ARW, ORF, RW2, etc.) — the original RAW file is always preserved byte-for-byte. What gets written alongside it is controlled by the RAW Files setting in Settings → Processing, which has three options:
- XMP sidecar — a
.xmpfile with the same base name as the RAW is written next to it. Lightroom, Capture One, and Bridge expect captions for these formats in exactly this form. If an.xmpsidecar already exists for that RAW, PhotoCaptioner AI merges into it rather than overwriting it — only the caption and (optional) GPS fields are touched, so any ratings, color labels, keywords, develop settings, and other metadata that Lightroom or Capture One previously wrote to the sidecar are preserved exactly. - TIFF copy — a captioned
.tiffsibling with the same base name is written next to the RAW, with the caption embedded in standard TIFF metadata. Useful for tools that read embedded TIFF metadata but not XMP sidecars. - Both (default) — both files are written, so the caption is readable by anything in your workflow no matter which format it prefers.
- XMP sidecar — a
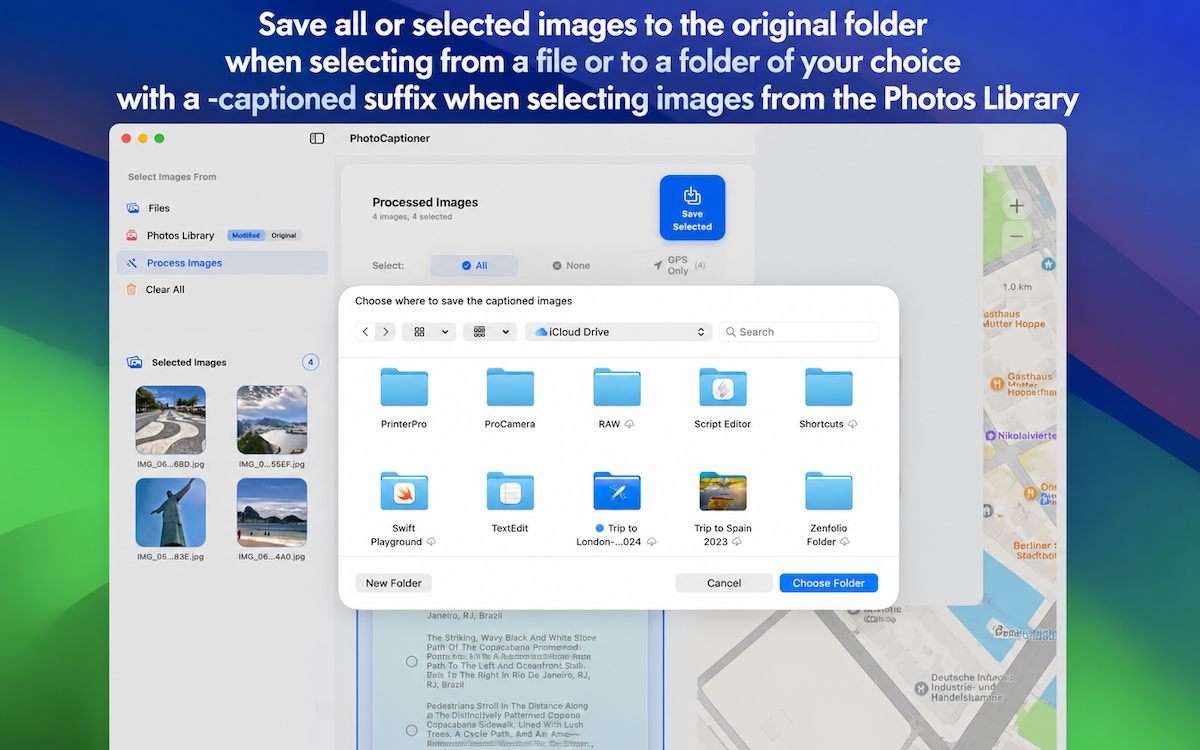
Saving Photos That Were Loaded From the Photos Library
Photos Library originals live inside an opaque macOS container that sandboxed apps cannot write back into. So when the source is Photos, PhotoCaptioner AI exports a new captioned file to a folder you choose:
- Click Save or Save All Selected.
- A folder picker appears. The default destination is ~/Pictures/PhotoCaptioner, but you can pick anywhere your account can write to.
- PhotoCaptioner AI exports each photo with a
_captionedsuffix appended to the original filename — for example,IMG_2034.jpgbecomesIMG_2034_captioned.jpg. This makes the captioned files easy to spot and impossible to confuse with the originals. - A progress bar tracks the export, with the current filename shown so you can see what's happening.
The original photo in your Photos Library is never replaced or modified. The export is a separate file that you can keep, archive, or import wherever you like.
Saving GPS Coordinates (Optional)
When Gemini identifies a recognizable landmark or place in a photo that doesn't already have GPS data, PhotoCaptioner AI looks up the coordinates from the Google Places / Geocoding API (or its local landmark database) and offers to embed them as EXIF GPS tags during save.
- Before each affected photo is written, a "Landmark Found" dialog appears showing the landmark name and the coordinates that would be saved.
- Save GPS Coordinates — embeds the looked-up latitude and longitude into the file's EXIF GPS block. Future apps (Photos, Lightroom, Finder map view) will treat the photo as geotagged.
- Skip This Photo — saves only the caption, leaving the GPS fields empty.
- During batch saves, the dialog also offers Save GPS for All Remaining and Skip All Remaining so you don't have to confirm one photo at a time.
Photos that already have GPS coordinates baked in by the camera are not affected — that original GPS is preserved and re-written exactly as it was. The dialog only appears when there is no existing GPS and a landmark match was found.
Viewing Location Maps
If your photos contain GPS data — which most iPhone and modern camera images do — PhotoCaptioner AI can show you exactly where they were taken.
How Geotagged Photos Display a Map
- Select a photo in the grid.
- The detail panel shows the photo on the left and a map on the right.
- A pin marks the exact GPS coordinates from the photo's EXIF data.
- If you have entered a Google Places API key, the closest verified place name is shown beneath the map.
The map is rendered locally using Apple's MapKit — no GPS coordinates leave your Mac for the map to be drawn.
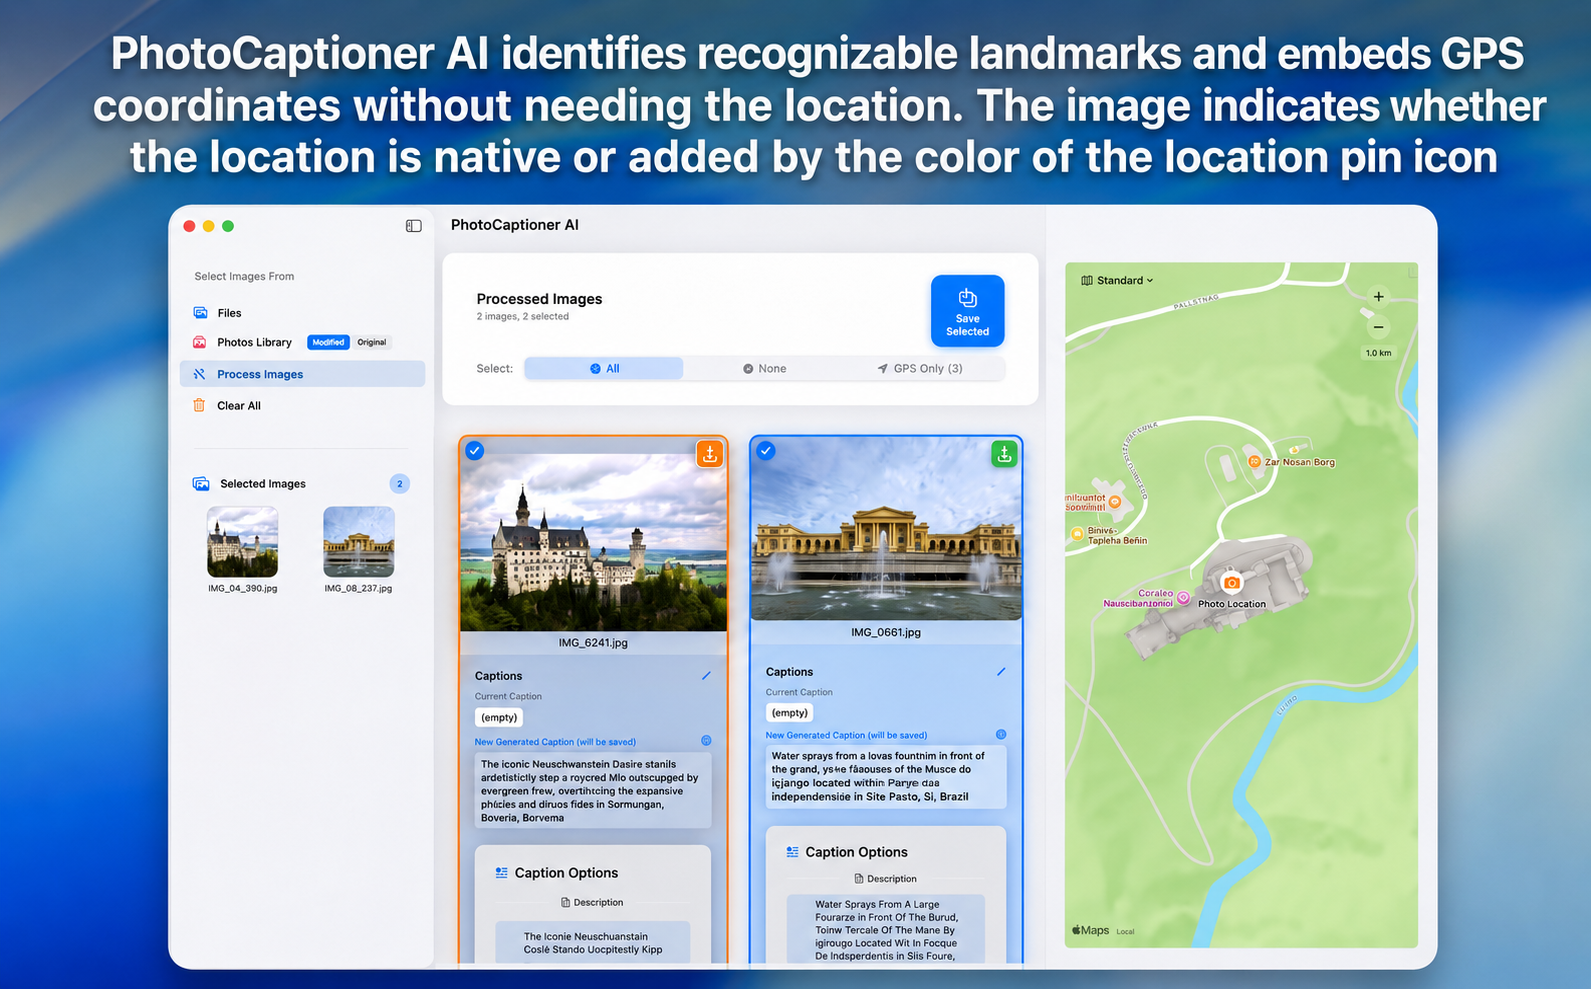
What the Location Icon Colors Mean
PhotoCaptioner AI shows a small location pin on each thumbnail and on the detail map. The pin color is meaningful — it tells you where the coordinates came from:
- Green pin — the GPS coordinates came directly from the photo's EXIF metadata. This is the trustworthy case: the camera or phone recorded the location at the moment of capture. Tooltip: "GPS from image metadata".
- Orange pin — the photo has no embedded GPS, and the coordinates shown were derived from the caption after Gemini identified a recognizable landmark or venue (then verified via the Places/Geocoding API or the local landmark database). Tooltip: "GPS derived from caption".
- No pin — no GPS metadata and no recognizable landmark in the caption. The map panel displays "No location data for this photo."
Treat green pins as ground truth. Treat orange pins as informed guesses — they are usually correct for well-known landmarks but should be verified before relying on them for archival cataloging.
What to Expect If a Photo Has No Location Data
- The map panel shows a message: "No location data for this photo."
- Captions are still generated normally — Gemini uses visual cues to guess the location instead.
- Common reasons a photo lacks GPS: it was taken with a camera that has no GPS, location services were off when shooting, or the metadata was stripped during sharing (e.g. via messaging apps).
Troubleshooting
If something isn't working, start here. Most issues fall into one of three buckets.
App Can't Access Photo Library
If PhotoCaptioner AI shows an error when trying to load your Photos library:
- Open System Settings.
- Go to Privacy & Security → Photos.
- Find PhotoCaptioner AI in the list and switch it on (set to All Photos for full access).
- Restart PhotoCaptioner AI.
If PhotoCaptioner AI doesn't appear in the list at all, open the app and click the Photos Library button once — macOS will then surface the permission request.
Caption Generation Fails
When captions fail to generate, the most likely causes are:
- No internet connection — verify your Mac is online. PhotoCaptioner AI can fall back to an on-device classifier, but it produces shorter, generic captions.
- Invalid or missing API key — open Settings → API Keys and confirm your Gemini key is present and not expired. You can re-paste it from the Google AI Studio dashboard.
- API quota exceeded — Google's free tier has rate limits. Check your usage at aistudio.google.com or upgrade your billing plan with Google.
- Gemini API outage — rare, but check Google Cloud Status if other things look fine.
Failed photos can be retried by selecting them and clicking Regenerate.
Photo Has No Location Map
If the map panel says "No location data":
- The photo simply doesn't contain GPS metadata. This is normal for screenshots, scanned images, photos shared via messaging apps, or shots taken with location services disabled.
- You can confirm by selecting the photo in Finder and opening File → Get Info — the More Info section will list GPS coordinates if present.
- There is no way to "add" GPS data to a photo from inside PhotoCaptioner AI; the caption itself will still be generated based on visual cues.
Still Stuck?
If something isn't covered here, get in touch via the support link in the Mac App Store listing, and we'll get back to you.
Frequently Asked Questions
Quick answers to the questions we hear most often. For the full explanation of any topic, follow the links to the relevant section above.
Is PhotoCaptioner AI free?
The app has two separate costs to understand. PhotoCaptioner AI itself includes a free trial of your first 25 captions (cache hits count); after that, a one-time Pro in-app purchase unlocks unlimited use. Separately, the AI captioning is powered by your own Google Gemini API key — Google's Gemini 3.6 Flash free tier costs nothing but has a small daily limit, and enabling billing on your Google account lifts that limit for a small per-request fee. See Section 2.
Do I need a credit card to get started?
No. You can create a Google Gemini API key and use Gemini 3.6 Flash on Google's free tier without entering any payment details. A credit card is only required if you later choose to enable billing (to lift the daily limit, use Google Search grounding, or switch to Gemini 3.1 Pro). See Section 2.
Are my photos uploaded to your servers?
No. PhotoCaptioner AI does not operate any captioning servers. Each photo goes directly from your Mac to Google's Gemini API using your own API key, over HTTPS. We never receive, store, or see your images or your billing information. Google's handling of that data is governed by its own terms.
Are my original photos modified or replaced?
Your originals are always preserved. For JPEG, HEIC, PNG, and TIFF, only the caption metadata is updated in place. For DNG, the caption is written into the DNG's own XMP packet without re-encoding the image. For proprietary RAW (CR2, NEF, ARW, etc.), the RAW file is kept byte-for-byte and the caption is written to a companion .xmp sidecar and/or .tiff copy. Photos Library items are exported as new _captioned files and the library original is never touched. See Section 8.
Why did captioning stop with a "quota exceeded" message?
You've reached Google's free-tier daily limit — a few dozen captions per day, set by Google and reset around midnight Pacific Time. The photos that didn't finish are simply left without a caption and stay in the grid, so you can re-run them after the reset without re-selecting your files. To remove the daily ceiling entirely, enable billing on the same Google account. See Understanding the Free Tier.
Do cached captions count against my Google quota or my free trial?
Two different things. Re-opening a photo you've already captioned is served from PhotoCaptioner's local cache and uses no Google Gemini quota and incurs no Google cost. However, cache hits do count toward PhotoCaptioner's own free trial of 25 captions, which prevents reopening the same photos to dodge the Pro upgrade. See the caching note in Section 3.
What's the difference between Gemini 3.6 Flash and 3.1 Pro?
Flash 3.6 is the free default — fast and excellent for everyday scenes, people, pets, food, and landscapes. Pro 3.1 requires billing and is noticeably better at identifying specific venues, landmarks, signage, and fine visual detail. You can switch between them anytime in Settings → API Keys. A good workflow is to stay on Flash and switch to Pro only for batches where a specific landmark matters. See Section 2.
Do I need the Google Places API key?
No — it's optional. The Places key turns "a stadium in New York" into "Yankee Stadium" by verifying place names against Google's data for your geotagged photos. Without it, captions are still generated using GPS hints and Gemini's visual reasoning. Note that Places is part of Google Maps Platform with its own pricing, and in PhotoCaptioner it's only used with Gemini 3.1 Pro. See Section 2, Step 3.
How do I avoid a surprise bill from Google?
Once billing is enabled, set a monthly spend cap directly in Google AI Studio (Dashboard → Spend → Edit spend cap). It's a hard ceiling, unlike Cloud Console budget alerts, which only notify you. Captioning is inexpensive — a large Flash batch is typically a few cents — but a spend cap means you can never be surprised. If you stay on Flash free tier with grounding off, you never incur charges at all. See Set a Monthly Spend Cap.
Why aren't people's names appearing in my captions?
This feature is off until you turn it on, because Apple stores tagged names privately inside your Photos library — not in the photo files. Enable Settings → General → Captions → Include People's Names and grant one-time, read-only access to your library. Only named, confirmed people are used; nothing is uploaded — the lookup happens entirely on your Mac. See Section 5.
Will the captions show up in Lightroom, Photos, and Finder?
Yes. Captions are written into the standard EXIF ImageDescription and IPTC Caption/Abstract fields (and XMP for RAW/DNG), which are read by Apple Photos, Lightroom, Capture One, Bridge, Preview, Finder's Get Info panel, and Spotlight. For RAW files, Lightroom and Capture One pick up the .xmp sidecar automatically. See Section 8.
Does PhotoCaptioner AI work without an internet connection?
AI captioning with Gemini requires internet. If a request can't reach Google, the app falls back to an on-device classifier (MobileNet) that produces shorter, more generic captions. For the rich, descriptive captions Gemini provides, you'll need to be online. See Section 10.
Can I undo a caption or restore the original?
Yes. While editing, press ⌘Z to undo. To restore the caption that was in the file before PhotoCaptioner touched it, click the Revert icon on the caption card, then Save — the original is kept in an internal catalog across sessions, even after you've saved an AI caption. See Section 7.
What image formats are supported?
JPEG, HEIC, PNG, TIFF, DNG, and proprietary RAW formats including CR2, CR3, NEF, ARW, ORF, RW2, and RAF. You can load them from a folder on your Mac or from your Apple Photos library. See Section 5.